seeing i have had a request for rice colouring ayama-style, s and i have been busy in the kitchen. it took a few attempts and the results are so so. i don't feel like writing long winded explanations so i went with small videos. i hope you enjoy it.
intro
yes i talk with my hands. my students often aped me by doing huge arm flapping guestures.
step one
this cupboard is emptied two or three times a day, so this is as about as tidy as it gets.
step two
i am not particular about the rice i use. i use what ever type we are eating. that said, we tend to eat basamti rice. it does not have a lot of starch in it so it does not absorb as much moisture. i have found that short grain and japanese grains tend to absorb the colouring a lot more so you need to dry the rice out slowly in the oven. when i do this i put the oven on the lowest heat (mine is 50 degress CELCIUS) for an hour or two. i just check to see if the rice is clumping together. i haven't coloured jasmine rice like i did for the tutorial before nor had i used that brand of colouring (colouring brands make a difference as to how much mositure is absorbed).
step three
a glimpse into my small pantry. in australia i always used the queen brand 'rainbow food colours 4 drop control vials' product. i don't have any left so i used a singaporean brand. this is a road test. i used the last of the queen brand on my first filming attempt.
step four
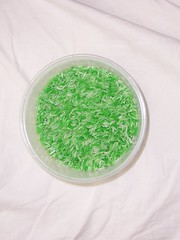
like is said above i use a drop control vial product in australia. next time i use the sinaporean food colouring, i am using an eyedropper so i do not have way tooo much colouring. you might be thinking how much do i need to use. you need to think of the effect. do you want the rice to be completely saturated? (this can lead to problems as it is difficult to get the rice grains to dry out completely. so there can be mold issues and if you choose to use it the rice on collages with little people you end up dyeing their hands (seen it happen at a K-12 school i taught at) and if you are really cursed, their clothes. some brands are impossible to get out of your clothes.) i quite like the mottle effect for rice like in the photos above. so i only use 2 drops. that is all it takes. my nerves got the better of me this morning.
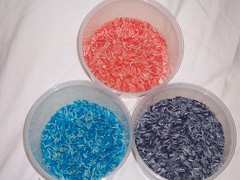
the above and below pictures are coloured basamati rice. i also wouldn't eat this the colour just isn't me and i am allergic to colour 122 found in the red and yellow. if i was colouring rice to eat it is saffron or tummeric all the way. another tutorial perhaps??
step five
and that folks is what i usually do when i colour rice. shake it until the rice stops taking up the colour.
errata
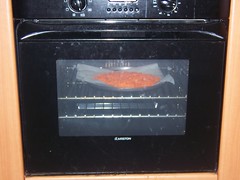
i added too much food colouring so the rice was wet. if this happens, put your oven on it's lowest setting and slowly dry it out. i tend to do this for an hour or so depending on how long i neglect it. i do not recommend your oven heat to be over 150 degrees celcius, though as you have to watch it and you can burn said rice. oh weevil kenevil was also found in my very orange rice, so i decided that i might be the lesser of two weevils to dry the rice out. we don't want to get it all mouldy now seeing that the price of rice is skyrocketing at the moment.
okay so now you have coloured the rice what are you going to do with it??
lookie loos are fabulous. mine is below. i filled it with buttons because they are the latest craze around here but they are a major chocking hazzard as well.

a good tutorial is here. after seeing this on the crafty crow, i became a ten ten fan, even though i had made a few before this. a lot of my early efforts went to my mother's group.
they also make great shakers (photo below and it is on the left. if you want a bigger size to look at it. just click the photo). i used a left over urine pot last year and this music maker is still a hit. i have another small plastic container now so i will make another one with different colours.

for the child who is not into licking the glue (like ct is at the moment. we only use the edible stuff). coloured rice and pasta is often used in Kindy/Preschool crafts. i also involved a whole class in a stroke order chart for one of the japanese alphabets using colours (though it wasn't just rice. i also used pipe cleaners, playdough and celephane paper for different small groups). one colour for first stroke etc to stress how you write the letter. i mean we write our english letters in a certain order. but this is getting off track.
i never took a photo of it but i made ct a texture box for her to feel the texture of different items. i glued rice on that. but it didn't last long because she kept sucking the blister pack piece.
at the moment i am slowly colouring rice to make this cool activity up for ct.
for other great ideas of how you could use your colour rice, go flick through the crafty crow. in the mean time, they i have put the rice in a larger container that ct, can't open for the moment and i have given her a wooden spoon to hit the container with. it makes a pretty interesting drum. there are lots of things you could adapt your rice for. i also think i might use coloured rice for my octopus's garden. shame that i can't get psychodelic food colouring though isn't it??
please forgive typos and spelling errors as blogger's spell check has decided to take a break. it is a bit difficult to edit with all this html coding....

5 comments:
You are soooo entertaining!
i love the video tutorial! you have a gorgeous voice. a touch of humor, great instruction, fabulous!
I'm with Anna. You crack me up! The rice is so pretty.
you DO have a lovely voice and are obviously completely barmy.
Thanks for this. What a fab tutorial, it taught me something new and made me smile. And now I know what I will be making for playgroup craft when my turn next comes up.
Post a Comment